
DIY: Sensory Friendly Homemade Pill Pocket Recipe for Dogs
Does your dog take daily medication causing you to spend waaaaay too much money on store bought pill pockets? Or maybe you’re scooping peanut butter out of dog specific peanut butter jar for your dog’s meds which leads to sticky, gooey, peanut butter allllll over your hands!
There’s a solution for you and I’m going to take you through a step-by-step tutorial.
How I make homemade pill pockets for my dogs using only 6 ingredients!
But first, let’s talk about the benefits of making homemade pill pockets!
They’re cheaper than store bought pill pockets!
You get to pick the ingredients making it more accessible for dogs with sensitive stomachs and allergies
They are much more sensory friendly then using peanut butter or canned food meatballs (in my opinion)
You can make large batches and store in the freezer which means fewer trips to the store!
They’re relatively easy to make - however, your mileage may vary here!
Okay, I promise the pill pocket recipe starts after this!
The measurements I’m using are for a bulk batch that fills three 2 cup pyrex containers. The general idea is adding equal parts flour and the “flavoring” ingredients. So, if your dog can’t have peanut butter (or you’re allergic) you can substitute with another nut butter like almond butter, canned pumpkin, cream cheese, or greek yogurt.
PS - make sure your “flavoring” ingredients do not contain Xylitol or Birch sugar (another name for xylitol)
Now, let’s get to the recipe!
Step 1: Gather all of your ingredients and supplies
Ingredients:
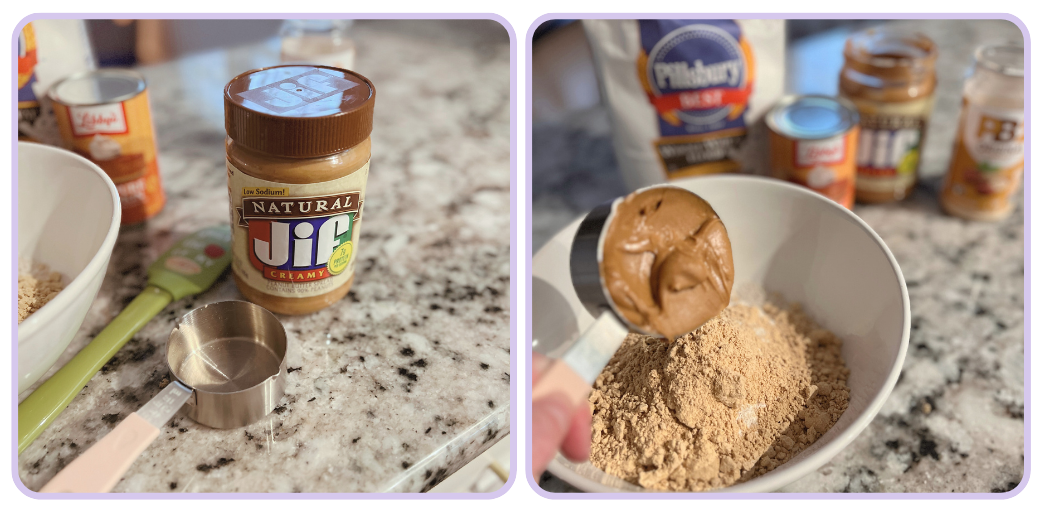
2 cups - whole wheat flour
1/2 cup - powdered peanut butter
1/2 cup - regular peanut butter
1 cup - canned pumpkin
Drizzle of olive oil
Water (as needed)
Supplies:
Large microwaveable bowl
1/2 cup and 1 cup measuring cups
Rubber spatula
Food storage containers

Step 2: Add the flour
Instructions:
Measure out 2 cups of whole wheat flour and add to the bowl. You can substitute the whole wheat flour for almond flour or oat flour.

Step 3: Add the powdered peanut butter
Instructions:
Measure out 1/2 cup of powdered peanut butter and add to the bowl. You can skip this step and double the amount of regular peanut butter if you don’t have powdered PB!

Step 4: Add the regular peanut butter
Instructions:
Measure out 1/2 cup of regular peanut butter and add to the bowl.
Tip: Adding the peanut butter to a separate bowl first and microwaving it for ~20 seconds will make it easier to mix it! I forgot to do this and quickly regretted it...
Step 5: Add the canned pumpkin
Instructions:
Measure out 1 cup of canned pumpkin and add to the bowl. Make sure you are using 100% pure pumpkin and not pumpkin pie mix!

Step 6: Add the olive oil
Instructions:
Add a drizzle of olive oil, I personally eyeball it but if you want to measure it I would do ½ tablespoon. I forgot to do this and had to add it in after I jumped ahead a few steps 😅

Step 7: Add the water and mix together
Instructions:
Add small amounts of water at a time, ~2 tablespoons as you mix all of the ingredients together. The water is to help everything combine nicely and turn the powdered peanut butter into more of a peanut butter like texture.
I personally like for the consistency to be similar to marshmallow fluff but you can make yours whatever consistency is best for you and your sensory needs!
Tip: if you accidentally add too much water, add a little bit of flour until it gets back to your preferred “gooey” consistency.

Step 8: Time to microwave
Instructions:
Once everything is mostly mixed together, microwave for ~2 minutes in 10-20 second increments while stirring in between zaps. This will cook the flour so it’s not raw and make it easier to mix the peanut butter if you forgot to heat it up earlier like I did!

Step 9: Transfer to a storage container
Instructions:
Once your mixture is heated throughout and all the ingredients are combined, it’s time to put it into a storage container! I use 2 cup glass pyrex containers and fill as many as I can.
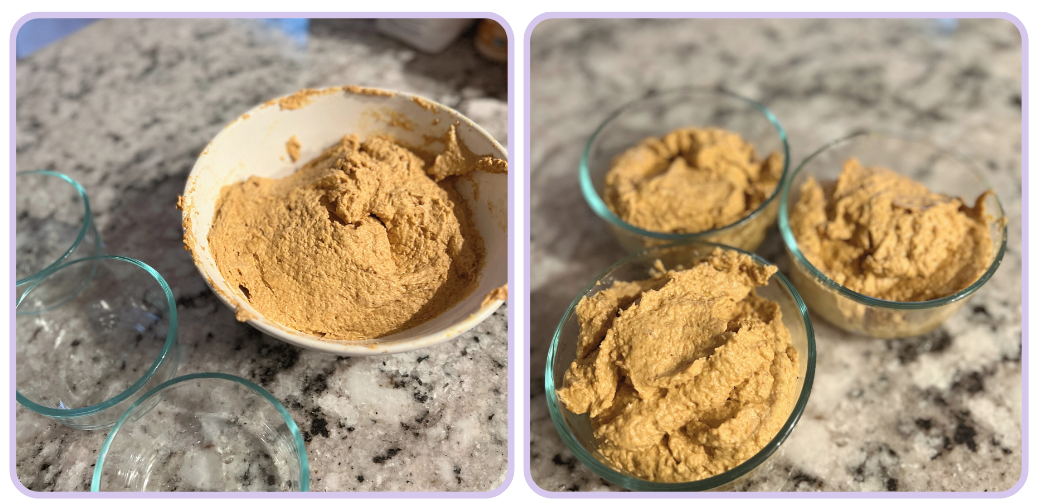
Step 10: Store in the fridge and/or freezer!
Instructions:
Once you have your pill pocket mixture in the storage containers you’ll want to store 1 container in the fridge and toss the rest in the freezer! You can also roll them into individual balls but I prefer to just scoop a little bit out each time.
According to google these are good for around 1 week in a sealed container in the fridge and up to 3 months in the freezer!

Bonus Step: Store your leftover pumpkin
Instructions:
If you don’t use the entire can of pumpkin you can cover it with a can cover and toss in the fridge. But, if you have ADHD like me and will forget about that can you can take the leftovers and pop them into an ice cube tray and toss in the freezer.
Or, if your ADHD gremlin threw away all of your ice cube trays during an overstimulation moment (totally not speaking from experience here...), spread it on lick mats for your dog(s)!

Want to see how I use the homemade pill pockets?
I pinch a little bit from the container, put the pill or capsule in, roll it around to create a ball, then feed to my dog!
P.S. Enjoyed this article and want a little something extra?
Download our Homemade Sensory-Friendly Dog Treat Recipe Book to get homemade treat recipes that you can bake for your dog without getting the ick!

